

Rustica field guide · Thick-door hardware
Hardware for 2¼-Inch Thick Wood Doors: Handles, Locks and Compatibility
Hardware for a 2¼-inch thick wood door must have a published thickness range that includes 2¼ inches, either as supplied or with an extension kit specified for the exact model. Also confirm the function, backset, bore sizes, spacing, handing and installation template before ordering or machining the door.
Make it useful
Prepare your 2¼-inch hardware order
Record what you know and see the specifications that still need confirmation. Thickness is one part of fit.
Your confirmation checklist
- Confirm the exact interior hinged hardware model, intended function and published slab-thickness range.
- Match backset, face and edge bores, spacing, handing and the manufacturer’s preparation template.
- Ask whether the exact variant needs a named thick-door kit, spindle, tailpiece, screw set or cylinder.
- For reused hardware, verify its model and generation; a brand name alone is insufficient.
Published Rustica privacy-lever candidates
Published thickness range includes your measurement. Confirm the 2⅛-inch face bore, selected 2⅜- or 2¾-inch backset, handing and final variant with Rustica. This is a thickness check, not complete fit approval.
- Coventry Privacy Lever — published 1⅜-2¼-inch range; 2⅛-inch face bore; standard 2⅜-inch backset, with 2¾ specified when needed.
- Rustic Privacy Lever — published 1⅜-2¼-inch range; 2⅛-inch face bore; standard 2⅜-inch backset, with 2¾ specified when needed.
Published product-page specifications reviewed October 5, 2026. Confirm the current exact variant, complete preparation and any required kit before purchasing.
Full guide and sources: https://rustica.com/hardware-for-2-1-4-inch-thick-doors/
A beautiful wood door deserves hardware that feels as considered as the door itself. The lever should sit comfortably in your hand, the latch should move cleanly, and the finish should complement the wood. On a 2¼-inch door, those choices begin with the dimensions behind the visible handle. A familiar-looking knob can have the wrong spindle, mounting screws or latch arrangement for a thicker slab.
The good news is that thick-door hardware is a manageable selection process. Start with the room and the way the door moves, record its preparation, and compare the exact hardware specifications. This guide brings those decisions together for Rustica wood doors, including useful interior privacy examples. For the construction and design reasons to choose this thickness, read why choose Rustica’s 2¼-inch thick wood doors.
Does standard door hardware fit a 2¼-inch door?
Sometimes it does; sometimes it requires a manufacturer’s thick-door kit; sometimes that model is not supported at this thickness. “Standard,” “adjustable” and “universal” are not enough information to decide. Find the stated minimum and maximum slab thickness for the precise knob, lever, handleset or deadbolt you are considering. A published maximum of 2 inches stops below your 2¼-inch slab.
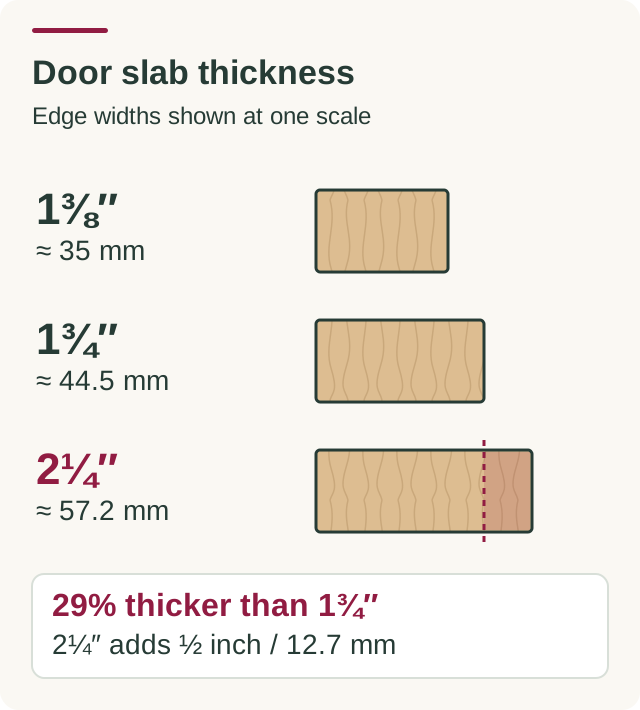
Keep each measurement in its own place. A 2¼-inch slab is 2.25 inches thick, approximately 57.2 millimeters. That number does not describe the backset, the diameter of a hole or the length of a faceplate. Those dimensions may look similar in a catalog, especially when fractions appear together. Labeling your measurements prevents ordering a product that mentions 2¼ inches for an entirely different reason.
 Open diagram at full size
A thicker wood door can be a wonderful design choice without requiring every piece of hardware to be custom made. What matters is documented support for the configuration you order. Ask whether the supported range applies to the product in the box or only after a particular kit is installed. Then keep that answer with the door order so the installer is working from the same information.
Measure the door before choosing a handle or lock
Open the door and measure across a plain section of its edge with a ruler or caliper. Measure the slab itself rather than the stop, weatherstrip, trim or raised decorative molding. If the door has not been made yet, use the ordered thickness on the current drawing. Record whether your figure is an existing measurement or a proposed specification; that distinction matters when the frame and hardware are still being selected.
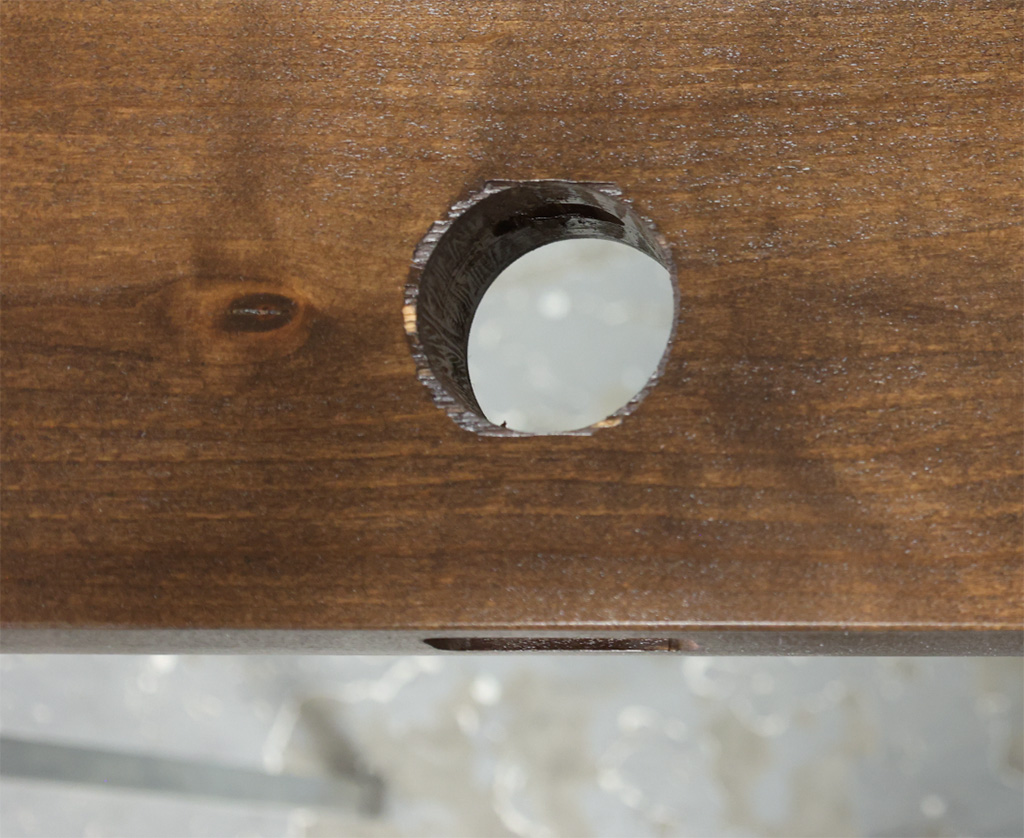
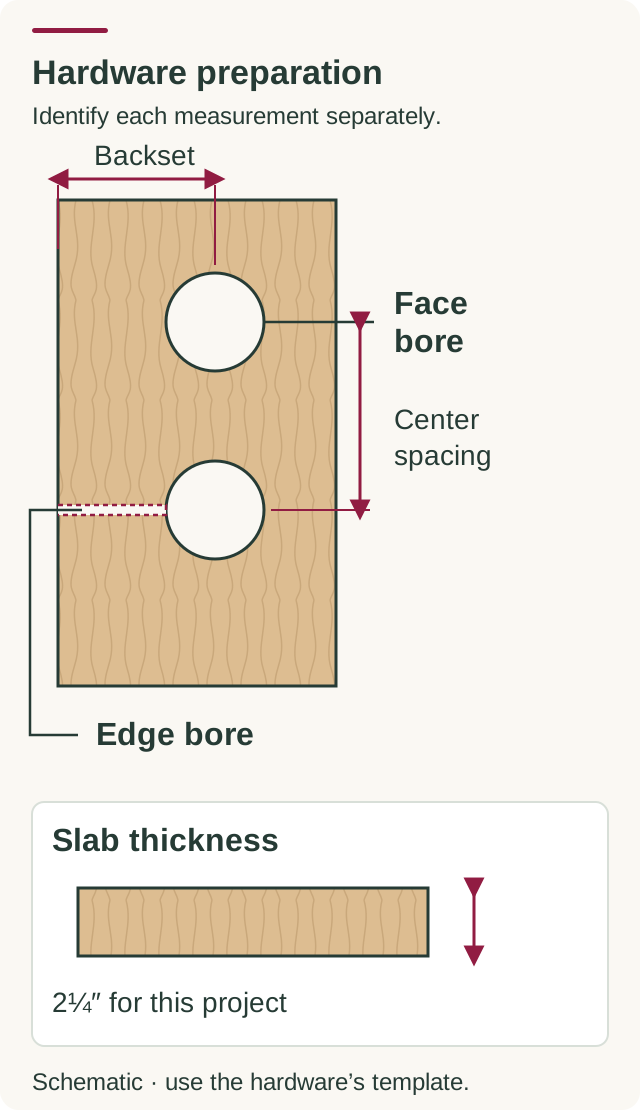
Next, examine the preparation. The large hole through the face is the cross bore. The smaller opening through the edge accepts the latch or bolt in a bored system. Backset is the distance from the latch edge to the center of the face bore. It runs along the face of the door, while thickness runs through the slab. A photograph with a ruler can make this distinction easier to explain to the person helping with your order.
 Open diagram at full size
| Measurement | What to record | Why it matters |
|---|---|---|
| Slab thickness | 2¼ inches, measured or specified | The supported range and any required kit |
| Backset | Edge to center of cross bore | Latch or bolt position |
| Cross bore | Diameter through the face | Lock chassis and trim preparation |
| Edge bore or mortise | Diameter or complete recess dimensions | The selected latch, bolt or lock body |
| Center spacing | Distance between handle and deadbolt centers | Trim clearance and required layout |
| Handing and swing | Viewing direction and opening direction | Lever, latch and assembly orientation |
Common bored residential preparations include a 2⅛-inch cross bore and 2⅜- or 2¾-inch backsets, but the selected product’s template controls. Schlage’s backset explanation defines the measurement, and its door-preparation checklist illustrates several common dimensions. Neither establishes that every lock in the brand fits a 2¼-inch slab.
For a glass or paneled wood door, note the available flat area around the preparation as well. The rosette, handleset plate or interior smart-lock housing must sit on an appropriate surface without interfering with glass framing or a panel profile. Send a full-door photograph as well as the close-up. The wide view often explains a clearance issue that a hole measurement alone cannot show.
Choose the function before the finish
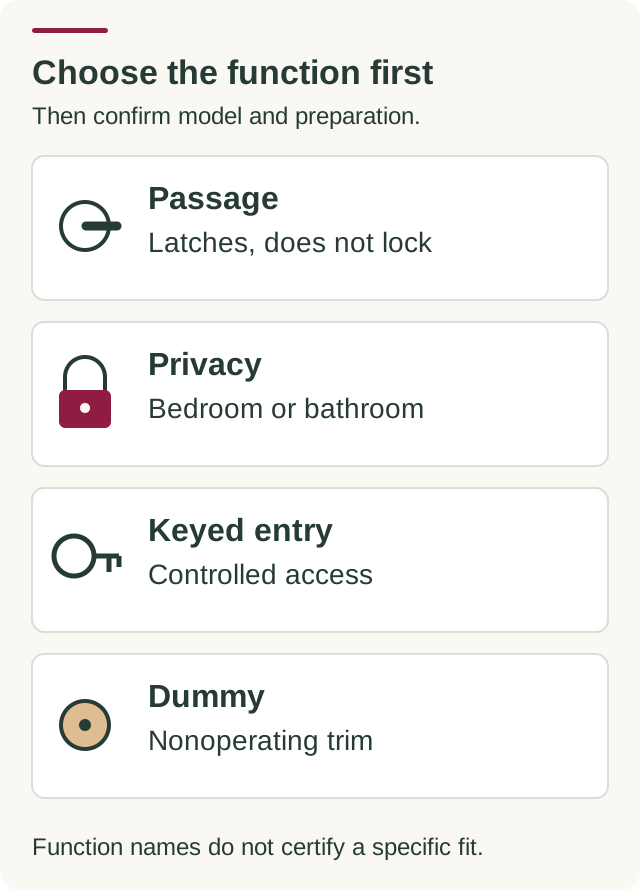
The room determines what the hardware needs to do. A hall door may need a latch without a lock. A bathroom needs an appropriate privacy arrangement. An exterior entry requires hardware intended for that application and its access requirements. Choosing the function first narrows the products worth comparing and keeps a beautiful interior privacy lever from being mistaken for an exterior keyed-entry set.
 Open diagram at full size
| Function | Typical purpose | Question to confirm |
|---|---|---|
| Passage | Latching without locking | Does the package include the required latch and strike? |
| Privacy | Everyday bedroom or bathroom privacy | How does it release from inside and provide emergency access? |
| Keyed entry | Controlled access | Is this exact function suitable for the location and required operation? |
| Dummy | Nonoperating trim or an inactive leaf | What holds the door closed, and how is the trim mounted? |
| Deadbolt | A separate locking bolt | Does its own thickness range and preparation match? |
| Smart or keypad lock | Electronic access or locking | Is the exact model supported with the correct thick-door parts? |
For paired doors, identify the active leaf before choosing matching-looking sets. The inactive leaf may need different trim, receiving hardware or bolts. A matching finish does not make the two packages functionally interchangeable. Similarly, “keypad” describes an interface, not the complete mounting specification. You still need to know how the unit locks, what is supplied and what door preparation it requires.
Once the function is settled, compare the grip, lever projection and finish against your wood door. Consider nearby walls and trim as the door swings. Rustica’s interior hardware guide covers broader style and selection decisions. Here, the focus stays on the dimensional and mechanical checks for 2¼-inch wood construction.
Rustica privacy levers with a published 2¼-inch range
Rustica’s Coventry and Rustic privacy lever pages offer useful starting points for an interior project. Their published specifications include slab thicknesses from 1⅜ to 2¼ inches and a 2⅛-inch bore. Both list a standard 2⅜-inch backset and instruct buyers to specify 2¾ inches if required. Those are documented dimensional candidates, with the final function and configuration still to confirm.
| Rustica product | Role | Published slab range | Preparation | Next step |
|---|---|---|---|---|
| Coventry | Interior privacy candidate | 1⅜–2¼ inches | 2⅛-inch bore; 2⅜-inch standard backset; specify 2¾ if needed | Confirm the selected configuration and current instructions |
| Rustic | Interior privacy candidate | 1⅜–2¼ inches | 2⅛-inch bore; 2⅜-inch standard backset; specify 2¾ if needed | Confirm the selected configuration and current instructions |
Use these examples for their stated role. A privacy lever is not a recommendation for an exterior keyed-entry application. A different function or variant needs its own specifications. Keep the exact product link with your project notes rather than relying on a family name or a picture of a similar lever.
This is also a helpful way to shop a premium wood door and its hardware together. All Rustica wood-door designs can be made 2¼ inches thick. Explore the interior wood-door collection or wood front-door collection, then share your chosen design, thickness and function with Rustica before finalizing preparation. Coordinate the separate lockset and its preparation with that complete door order.
What does a thick-door extension kit change?
A thick-door kit supplies the parts that a particular hardware design needs to span a thicker slab. Depending on the model, those may include mounting screws, a spindle, a tailpiece or other components. The package name should identify the supported hardware and thickness range. The phrase “thick-door kit” alone tells you too little to place an accurate order.
One exact manufacturer example shows why the details matter. Schlage’s BE375 thick-door instructions identify the BE375 model, cover 1⅞–2½-inch doors, and divide screw selection into thickness groups. The instructions also require replacing the touchscreen tailpiece. This is an illustration of a specified kit procedure, not a recommendation for every Schlage lock or every Rustica door.
| Evidence | Useful example | What remains to check |
|---|---|---|
| Named model | BE375 in the cited Schlage document | Your exact model and revision |
| Thickness range | 1⅞–2½ inches in that document | The measured or ordered slab |
| Changed components | Screw selection and replacement tailpiece | The supplied parts and current instructions |
| Complete preparation | A separate lock installation procedure is referenced | Bores, backset, clearances and strike |
Manufacturing era can matter when a hardware family has changed. Give the manufacturer the exact model, function and any date or revision shown on the lock or packaging. A kit for an earlier assembly may not be the specified kit for a later one. If you cannot identify the version, send photographs of the markings and both sides of the hardware before purchasing parts.
For a new door, resolve these questions before machining. For a replacement, keep the old components together until the new configuration is confirmed. A longer screw may reach across the door while leaving the wrong spindle or tailpiece engagement. Choosing the manufacturer’s specified solution is a better starting point than assembling an improvised kit from similarly sized parts.
Choosing a smart lock for a 2¼-inch wood door
Start with the exact smart-lock model rather than the brand’s general reputation or the features on its keypad. Look for an installation document that states the standard slab range and any supported thick-door solution. Electronic models within one brand can use different mounting plates, interior housings and tailpieces. An extension kit listed for one of them should not be assumed to support another.
Then look beyond the slab range. The interior housing needs clear space on the face of the door, and the outside trim needs the correct preparation. Check the spacing above a separate lever or handleset so the pieces do not overlap. On a paneled or glazed door, compare the full housing outline to the usable flat area, not only the diameter of the cross bore.
For an existing door, inspect how the latch and bolt operate before attributing a problem to electronics. A door that must be lifted or pulled to lock needs an alignment review. Record whether the bolt moves easily with the door open and closed, then give that information to the installer. A thick-door kit addresses the specified mounting configuration; it is not a correction for a misaligned strike or rubbing slab.
Choose your access features after the mechanical fit is documented. Think about how family members will operate the lock, how batteries are accessed and what the manufacturer specifies for setup. Keep its current installation and operating instructions with the hardware record. That makes later servicing much easier than trying to reconstruct the order from a general “smart deadbolt” description.
Deadbolts and entry handlesets need separate fit checks
A front entry may combine a pull, an operating lever and a deadbolt. Check each component instead of assuming that a matching set has one universal thickness allowance. The lower mounting point of a handleset can add a dimension beyond the knob’s cross bore. An adjustable mounting feature also has a stated range; it does not remove the need to match the preparation.
For replacement work, measure the existing holes before selecting a different plate style. A larger plate may cover a previous footprint without matching the latch or mounting locations behind it. A smaller plate can leave old finish lines visible. Ask for the complete template and compare it to the actual slab. Coordinate any changes with the door supplier and installer before cutting new holes into finished wood.
For exterior use, confirm the intended application, finish suitability and required operation of the exact lockset. A thickness range is not a security or weather rating. The door, frame, strike and installation all belong in the decision. The exterior thickness guide explains that complete entry assembly, while Rustica’s exterior knob replacement guide covers the broader replacement sequence.
Hinges, pivots, barn tracks and pocket systems
Handles and locks are only part of the hardware package. The support system carries and guides the door. For a hinged wood slab, confirm the door’s complete dimensions, weight, hinge preparation and supporting frame. Select hinge size, count, fasteners and mounting details from the requirements for the chosen assembly. Thickness alone cannot provide an accurate hinge schedule.
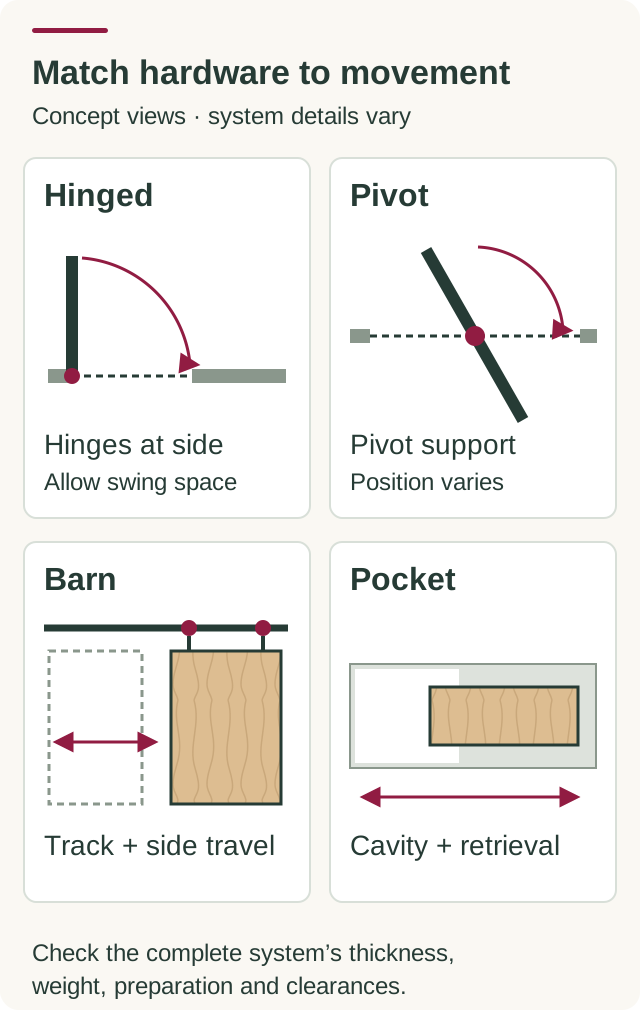 Open diagram at full size
A pivot door has a different support arrangement and preparation from an ordinary hinged slab. The pivot location, door dimensions, load range and surrounding clearances must work together. A substantial wood door deserves a system selected for that configuration. Do not substitute a pivot specification for a hinge specification because both products describe a heavy door.
On a barn door, check the hanger’s permitted thickness and load, mounting arrangement, spacing from the wall, floor guide and any pull mounted on the wall-facing side. A handle that projects into the sliding path can interfere even when its fasteners accommodate 2¼ inches. Consult Rustica’s barn-door measuring guide and the selected system’s instructions for the complete layout.
A pocket door must travel inside its wall cavity. Confirm the system’s supported slab thickness, weight and complete frame dimensions, plus the pull’s recess and projection. Make sure the fully open panel can be retrieved. Use the dedicated pocket-door hardware guide for functions and preparation. A thick hinged wood slab and a pocket system should be evaluated as separate configurations.
Plan the frame and preparation with the door order
If you are upgrading from a thinner slab, review the existing frame before treating the change as a simple hardware swap. Stops, hinge positions, swing clearance and the strike must suit the new assembly. The appropriate slab width and height do not establish that the frame will accept a thicker leaf. Bring measurements and photographs of the frame as well as the door.
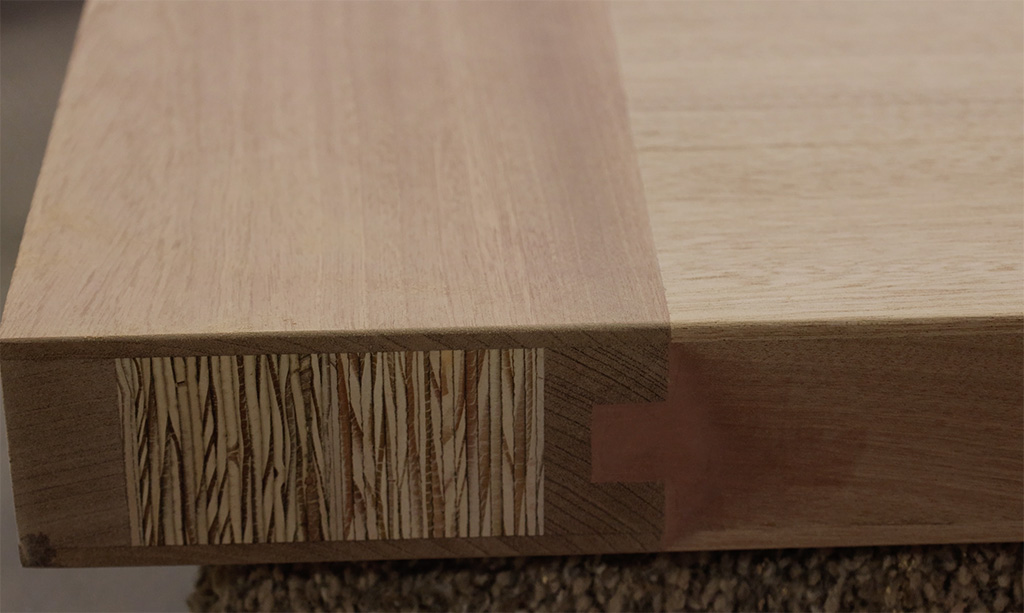
A prehung door can provide a coordinated door-and-frame starting point, but review the included scope carefully. Confirm which hinges, preparation and other hardware are supplied, and which pieces you are selecting separately. A slab-only order leaves more coordination to the existing frame and installer. Put those responsibilities on the order before fabrication rather than discovering them at installation.
Use Standard Door Sizes for width, height and opening measurements, and the general thickness guide to distinguish slab thickness from jamb depth. Hardware selection does not determine a universal rough opening. The selected door assembly’s current instructions supply that requirement.
Your 2¼-inch hardware ordering checklist
Keep one project record for the door and all its hardware. A useful record names the actual products, not just “black lever” or “thick-door deadbolt.” Include the door configuration, room, thickness, measured preparation and the current document for each component. If you are working with a builder or installer, have everyone check the same record before the order is finalized.
The checklist below is interactive: select the items you have confirmed. An unchecked item identifies information still to collect; checking every box is not a manufacturer compatibility certification. For a helpful printout, use your browser’s Print command and keep the page with your measurements, product links and drawings.
When asking for help, send the exact product links and a concise description of the project. For an existing door, add photographs of the face, edge, frame and hardware markings. For a new door, send the proposed drawing and hardware specifications. Explain which decisions are settled and which are open. This gives the person assisting you something concrete to evaluate instead of a guess about what “standard” means.
Three clear compatibility outcomes
A useful fit check should finish with a specific next action. If the published range includes your thickness, move on to preparation and application. If a named kit is required, verify that kit and the final assembly instructions. If the model, range or revision is unknown, stop at confirmation rather than labeling the product compatible from its appearance.
| Evidence found | Accurate outcome | Next action |
|---|---|---|
| Published range includes 2¼ inches | Thickness support is documented | Confirm function, preparation and current configuration |
| Named kit supports the exact model at 2¼ inches | Specified kit is required | Order the correct parts and follow the final instructions |
| Range, model or revision is unknown | Compatibility needs confirmation | Contact the manufacturer or supplier with identifying details |
| Maximum range stops below 2¼ inches | Published thickness support is absent | Select a documented alternative or obtain a specified solution |
This approach makes hardware shopping much more straightforward. You can enjoy comparing shapes and finishes once the mechanical questions have a documented answer. It also protects the coordinated look of a premium wood-door project: the visible hardware, preparation and support system are chosen together, with fewer surprises when the door arrives.
Questions about hardware for 2¼-inch thick doors
Will a doorknob from my 1¾-inch door fit a 2¼-inch door?
Check the existing knob’s exact model and published range. Reuse may be possible if that range includes 2¼ inches or a specified kit supports the model. Also compare the function, backset, bores and trim layout. The fact that the knob worked on a thinner door does not establish support for the thicker one.
Can I use longer screws instead of a thick-door kit?
Use the manufacturer’s specified solution. Some designs require different operating components as well as mounting screws. Schlage’s BE375 example includes a replacement tailpiece, demonstrating why screw length alone is not a universal fix. Ask for the parts and instructions for your exact model rather than adapting the example to another lock.
Is a 2¼-inch backset the same as 2¼-inch door thickness?
No. Thickness is the distance across the slab’s edge. Backset is measured along the face from the latch edge to the center of the cross bore. Record them separately and compare both to the hardware’s preparation drawing. A matching number in one field does not answer the other fit question.
Do privacy levers provide exterior keyed-entry security?
A privacy function serves a different purpose from keyed entry. Coventry and Rustic are discussed here as interior privacy candidates based on their product pages. For a front door, choose the required entry function and intended application, then verify the complete lockset, frame and strike configuration.
Does 2¼-inch thickness tell me which hinges to buy?
No. Give the installer or supplier the door’s width, height, complete weight, construction and frame details. Hinge size, number and fastening must follow the requirements of the selected assembly. Pivot, barn and pocket systems have their own support and clearance checks.
What should I send Rustica when I need hardware help?
Send the door model or proposed configuration, measured thickness, room and movement, exact hardware links, preparation dimensions and photographs. Identify whether you are ordering a new assembly or replacing a slab. Those details help turn a broad hardware question into a practical review of your project.
For more context, compare standard door thicknesses, review exterior wood-door thickness choices, and explore Rustica’s 2¼-inch thick wood doors. Keep this hardware guide beside the selected product documents as you complete the door order.
Sources and specifications
Product descriptions and manufacturer instructions support the specific examples in this guide. Published ranges and available configurations can change; use the current documents supplied for the hardware you order.
Bring your measurements to the next conversation.
Explore the contractor discount program

