Rustica field guide · Hardware planning
How to Lock a Sliding Barn Door: Choose, Measure and Fit
You can lock a sliding barn door with hardware designed for its movement and mounting surfaces. Start by choosing the function: simple closure, bathroom privacy or a documented security application. Then check the door arrangement, material, thickness, track and clearances against the lock’s instructions. A lock that looks right can still be incompatible with the door. Confirm inside and outside operation before ordering, and use the exact installation template before drilling.

Make it useful
Prepare a lock fit checklist
Record your door details and check several published Rustica Latch + Lock limits. The result is a preparation checklist, not a confirmed product match.
Rustica Latch + Lock is for interior residential light-duty use. Start with the exact door, track and hanger models. You can print this checklist even when some details remain unknown.
Measure without pushing or lifting the door. A stile is a vertical frame member of the door. Record the solid width available for the required preparation.
Your details still need model confirmation
No entered value has triggered one of these checks. Missing details and untested combinations remain unverified.
Keep these items on the project checklist
- Measure door thickness.
- Measure solid stile width.
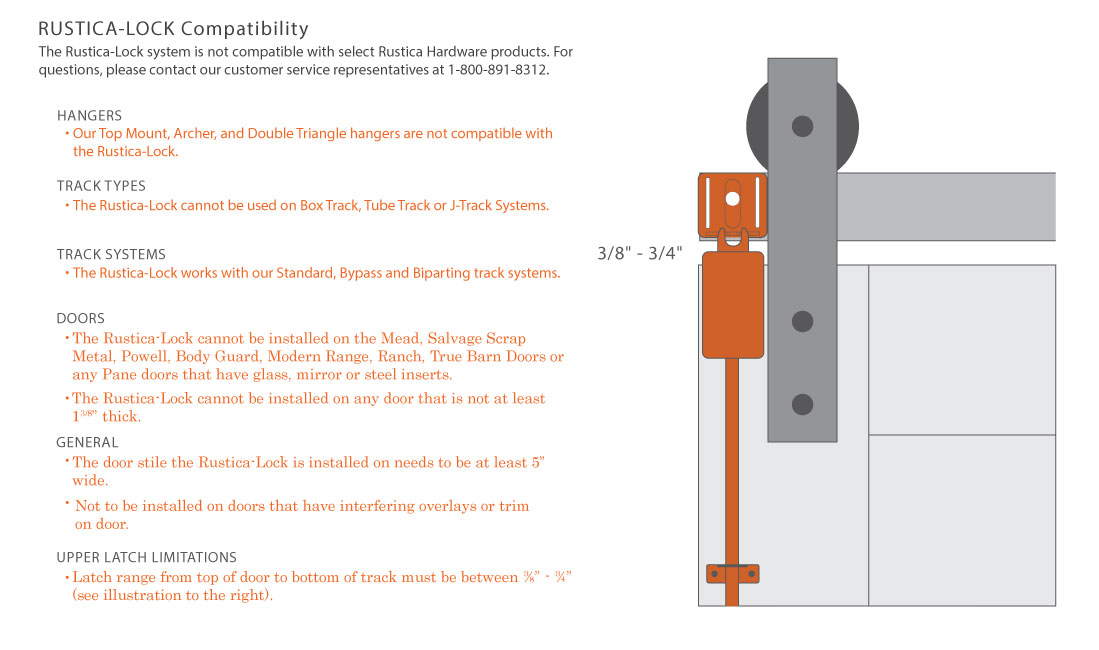
- Measure top-of-door to bottom-of-track clearance.
- Confirm that the use is interior residential light duty.
- Identify the door material and solid area available for preparation.
- Identify the track model and check it against the compatibility drawing.
- Confirm the exact hanger model; selecting another hanger is not a compatibility approval.
- Confirm the arrangement and the applicable configuration drawing.
- Decide what operation is needed from outside the room.
- Check the complete door-style exclusions, trim, overlays and inserts, and use the instructions supplied with the selected kit.
Sources: current product specifications and compatibility drawing. This checklist does not confirm security, accessibility or exit-code compliance.
Full guide and sources: https://rustica.com/how-to-lock-sliding-barn-door/
1. Decide how the door needs to open
Think through both sides of the closed door before choosing a lock. Who uses the room? Should someone outside be able to enter with a key, release tool or ordinary handle? Should the latch catch automatically, or should the person inside engage it each time?
| Use | Function to resolve | Important check |
|---|---|---|
| Bathroom or bedroom | Privacy from inside, with a planned outside-release method. | Verify the exact model’s release and make sure it remains accessible. |
| Pantry or cabinet | A catch or latch that keeps the panel closed. | Decide whether a locking function is needed at all. |
| Shared home office | The desired access on each side, including any keyed function. | A key does not establish forced-entry performance. |
| Exterior entry | A complete door and lock assembly suited to exposure and the intended entrance. | Check security, weather and exit requirements for that application. |
For a visual comparison of the mechanisms, see eight types of barn door latches. This guide focuses on choosing and fitting a system to your actual opening.
2. Identify the door arrangement
Stand on the side with the exposed track and draw the opening as you see it. Mark which panel moves, where it rests when closed, and which side you want to operate. This simple sketch is more useful than describing the installation as “left-handed” without a reference view.
| Arrangement | What the panels do | What the lock must accommodate |
|---|---|---|
| Single sliding door | One panel moves along the wall. | The closing edge, wall or jamb gap, and the full travel of handles and hardware. |
| Bi-parting pair | Two panels move apart to open and meet in the middle to close. | The meeting edges and any required order of operation. |
| Bypass system | Panels move past one another on different planes. | The offset between panels and clearances around projecting hardware. |
| Pocket door | A panel slides into a wall cavity. | Hardware that fits the pocket and remains usable at the door edge. |
| Folding door | Connected panels fold at hinges. | The hinges, folding path and hardware specified for the system. |
Compare double barn door arrangements if you are still choosing a layout. Pocket door hardware and bifolding door systems have their own requirements.
3. Record the measurements that control fit
Measure the installed door in its normal closed position. Do not push it toward the wall to create a smaller gap. If it rolls unevenly, rubs or moves out of its guide, resolve that condition before measuring for a lock.
| Record | Where to check it | Why it matters |
|---|---|---|
| Door thickness | At the planned lock location. | The body, fasteners and connecting parts must fit that thickness. |
| Solid mounting area | Across the stile or other area receiving the hardware. | A bore or mortise needs adequate material and edge distance. |
| Door-to-jamb or wall relationship | At the intended latch and keeper. | The two parts must align without forcing the door. |
| Hardware projection | On both faces and along the entire travel. | Handles and locks must clear walls, trim and passing panels. |
| Track and hanger details | Model names plus any specified latch clearance. | Track-operated locks may have precise compatibility limits. |
| Outside access | With the panel fully closed. | A keyway or release must remain reachable. |
Photograph the open and closed positions and include the tape measure in the closeups. Use the selected lock’s drawing to decide which measurements need closer precision. Do not choose drill sizes or hole locations from a different model’s instructions.
4. Check the complete Rustica Latch + Lock system
Rustica Latch + Lock is an interior residential, light-duty product. It is not intended as a security solution. The product page requires a wood door that can receive a bore and excludes doors over two inches thick. Door material and thickness are only the first checks.
The current compatibility drawing also excludes Top Mount, Archer and Double Triangle hangers, as well as Box, Tube and J Track systems. It lists door-style exclusions and requires a stile at least five inches wide. The stated distance from the top of the door to the bottom of the track is 3/8 to 3/4 inch.
Check the full drawing for the minimum door thickness, specific door styles and other limits. Raised trim, overlays, glass, mirror and metal inserts can interfere with the preparation or mechanism. Send the actual door and hardware selection to Rustica if a detail does not match the drawing.
Single, bi-parting and bypass arrangements are listed for this product, but that does not make every track or hanger in those categories compatible. Confirm the particular combination and operating function before ordering.
5. Install from the instructions for the selected kit
The installation process depends on what receives the lock. A teardrop latch needs aligned surfaces for its pivot and keeper. A mortised lock needs the correct recess. A track-operated mechanism needs the specified relationship between the door and track.
- Identify the exact product, function and supplied template. Check that the door and hardware match its requirements.
- Confirm the closed position, guide engagement and free travel before marking any holes.
- Plan the work and support the door as required by the instructions. Arrange help if the slab must be removed or rehung.
- Prepare and fasten each component using the specified locations, hardware and sequence.
- Check operation with the door open before testing the closed installation.
The Rustica Lock assembly instructions show the door preparation, rail, top latch and alternate configurations for that system. Use the version supplied for the kit you receive. The Rustica lock installation guide provides additional context, but the product instructions control the installation.
Avoid adding a board, spacer or track-blocking bar as a universal fix. A change that helps one latch meet its keeper may create rubbing, restrict travel or interfere with another part of the system.
6. Check inside operation and outside access
Check each action separately: closing, latching, locking, unlocking and opening. A door may latch correctly but still have a handle or release that becomes difficult to reach when closed. Test the complete travel, not just the last inch of closing.
- Operate the lock from each side that is meant to control it.
- For a privacy lock, test the documented outside-release method with the door open first.
- Confirm that trim, overlap and adjacent panels leave the keyway or release accessible.
- Make sure handles, guides and lock parts remain clear throughout travel.
- Repeat the operation without lifting the slab, pushing it toward the wall or forcing the latch.
Keep the door open until you have verified how it can be opened from outside. Then have another adult outside during the first closed-door check. If the instructions do not describe an outside release, ask the manufacturer before treating the lock as suitable for a bathroom where that feature is needed.
Bathroom privacy and ease of use
A bathroom barn door needs more than a way to stay shut. Consider the reach and hand motion needed to operate the lock, the outside-release plan, and any view through the edges. The privacy-sweep measurement guide helps you evaluate edge gaps, a different privacy concern from the lock.
Where accessibility requirements apply, the U.S. Access Board’s door guide addresses operable hardware, including one-hand use and a 34–48-inch mounting range. Those provisions have a defined scope; they are not a universal drilling height for every home or lock. Choose the installation to meet both the product instructions and the requirements for the opening.
For required exits and fire-rated openings, have a qualified professional check the complete assembly before changing hardware. An emergency privacy release does not, by itself, establish an approved exit arrangement.
Can you lock a barn door from outside?
Yes, if the selected system provides that function. A keyed cylinder, a privacy release and an ordinary two-sided handle do different jobs. A key controls access. A privacy release lets someone open a privacy lock when needed. A handle on each side does not necessarily mean both sides can lock the door.
Ask for a clear description of each side when ordering. A barrel bolt is not automatically keyed, and an exterior hasp is not a substitute for a suitable lock on an occupied room. For an entrance to the home, evaluate the complete door, supporting structure and hardware together.
Compare front entry door options if the project needs an exterior entrance assembly. Do not use an interior light-duty barn door lock as the basis for an exterior security claim.
If the latch will not engage
| Symptom | First check |
|---|---|
| The keeper is slightly out of reach. | Compare the actual closing position and mounting dimensions with the template. |
| The lock worked before but now catches. | Look for loose mounting, a changed guide position or door alignment. |
| A bypass panel hits the lock. | Check the complete panel overlap and projection against the system drawing. |
| The lock engages only when the door is lifted. | Inspect the door support and alignment before changing the keeper. |
| Outside access is blocked. | Check the specified release location and whether the chosen arrangement allows access. |
For broader mechanical problems, use the door repair guide to separate the symptom from the likely cause. Stop using hardware that binds or has loose supporting parts until the cause is addressed.
Bring the measurements to your hardware choice
Compare barn door locking hardware using the function and fit checks above. For a client project, collect the door schedule, hardware models and inside/outside operation requirements before ordering. Apply for Rustica’s contractor discount program for help planning professional purchases.
Keep planning your project
Sources and product documents
Bring your measurements to the next conversation.
Explore the contractor discount program