
1.800.891.8312
800-891-8312
FREE SHIPPING*
Free Shipping Details
Most orders over $500 qualify. Free shipping applies to Barn Door Hardware, Barn Doors, and Pocket Doors over $500.
Note: Front doors, interior doors, shower doors, any oversized door (wider than 3ft and taller than 7ft) and any special order doors have shipping costs calculated at checkout. Some barn door hardware track lengths do not qualify for free shipping.


What is Shiplap? 5 Ways to Use Shiplap During Renovations
Friday, May 24th, 2019
Author: Kate Allen - Rustica Founder and CEO
Share
The word “shiplap” took the media by storm after the HGTV show “Fixer Upper” featured several home renovations featuring the favored wall decor of Chip and Joanna Gaines. These wooden boards have been used for years on exterior walls of sheds and barns. Thanks to Chip and Joanna, homeowners are now incorporating rustic chic shiplap into interior spaces in innovative ways.
5 Ways to Use Shiplap During Renovations
Accent Walls
Backsplash
Ceilings
Wainscoting
Fireplaces
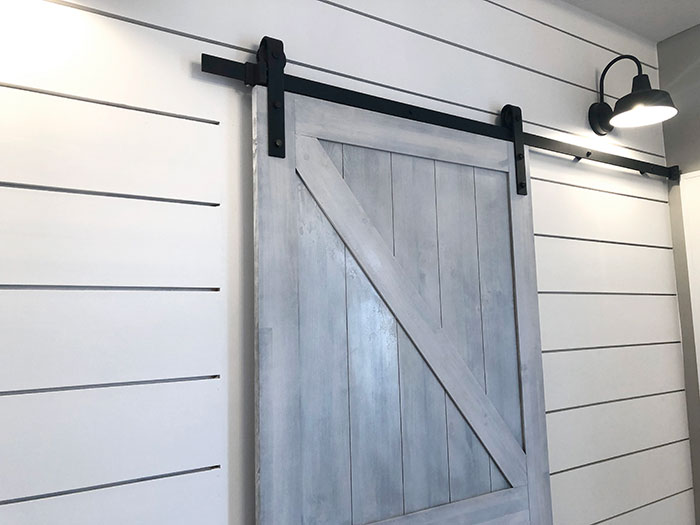
Shiplap is a term that is often used incorrectly on many remodeling TV shows. Designers use wood paneling or planks that merely resemble shiplap. Although shiplap often looks like white-washed wooden planks, true shiplap is a bit more complex.
What is Shiplap?
Shiplap is crafted with a rabbet or notch cut on both edges of the board. Like the tongue and groove of generic wooden planks, this shape allows for cladding, which is a technique in which one material is placed over the other. When these boards are installed horizontally or vertically, they will naturally slide and “lap” one on top of the other, creating a perfect fit as they self-space. The finished product will be flush and solid with a tight seal.
Perfectly placed together, the boards prevent any elements like wind or water from seeping in, which actually speaks to the origin of the word “shiplap.” Past shipbuilding techniques used boards similar to modern shiplap to build the hulls of ships. This created a watertight layer of protection, allowing the boats to sail safely across oceans.
Today, shiplap isn’t really used in ship construction. Instead, homeowners have found creative ways to incorporate the useful and stylish wooden boards (as well as their plank and board lookalikes) throughout a home’s floor plan, both in the exterior and interior. Many homeowners still choose to line their exterior walls with shiplap siding that’s generally made completely of natural wood. For interior spaces, homeowners choose from two main styles of shiplap: flat profile and novelty drop.
Flat Profile Shiplap
The flat profile style is the traditional shiplap with a rabbet on the top and bottom edges on alternate sides of the board. This allows for boards to slide on top of and underneath each other (lapping) to create a tight, sealed fit.
Novelty Drop
This style is also referred to as drop siding. The paneling features a dramatic drop on the entire length of the bottom of the board. The back, top edge features a rabbet like the flat profile, allowing for boards to still fit nicely together for a tight fit.
Faux Shiplap
Many people mistake faux shiplap for the real thing. This is essentially a wood plank with a tongue and groove feature. In this style, a wooden panel’s bottom edge is carved out and its upper edge carved into a protruding lip. When placed horizontally or vertically, the protruding lip of one board slides into the carved portion of another.
Shiplap Installation
Rustica offers a selection of both shiplap and wood planks in alder, poplar, and pine paneling. If you’re looking to install shiplap or its lookalike DIY, you’ll find Rustica’s guide “How to Install Shiplap” to be very helpful throughout the process. Similar to Rustica’s popular DIY Barn Door Kit, this installation guide provides all the information you need to avoid a few rookie mistakes of first-time shiplap DIY-ers (like not letting your wood rest before beginning installation). Below are the general steps required for installing shiplap throughout your home:
Step 1
First, you’ll need to figure out your space’s square footage. Measure your wall from top to bottom to get the height. That measurement needs to be multiplied by the width to get your square footage. Then, you’ll be able to order the right amount of shiplap. You can check out Rustica’s quality selection of planks, choosing the style of wood, finish, and then your preferred width of the boards.
Step 2
Gather the tools you’ll need while you await your shipment’s arrival. If you’re installing onto a wall, find the studs. If you’re installing onto a ceiling, find the rafters.
Tools:
Air Compressor
Nail Gun
Miter Saw
Table Saw
Caulk Gun (optional, depending on if you want an extra layer of adhesive)
Another important and helpful tip for shiplap preparation is to allow your wall paneling to acclimate to your home’s temperature and humidity. This is true for whether you are nailing your panels to the wall or if you are using peel and stick paneling. The wood will either shrink or expand so it’s best to allow this process to occur before you begin installation, so your boards don’t produce an unplanned gap over time.
Step 3
Once the wood is acclimated, you’ll want to start at the bottom of your wall choosing to work either left to right or right to left consistently. Whether you are installing onto drywall or directly onto exposed beams, you will want to create a consistent joist pattern as it will show in your finished product.
Step 4
Once all rows have been installed, you can decide to place caulking at the ceiling and floor joists. If not, you’re done!
5 Ways to Use Shiplap During Renovations
Just because the Gaines more or else revamped shiplap’s popularity does not mean that its fame will fade with the ending of their show. For certain, shiplap is here to stay, especially as more homeowners are taking on the exciting task of DIY home renovation.
Accent Walls
Looking for a reclaimed wood feel to revive a boring interior space? Many homeowners choose to install shiplap in a bathroom, dining area, or living room. Rustica’s selection of shiplap and faux shiplap boards offer beautiful options for accent walls for your home’s interior space. Whether you’re looking for the bold, straight lines of a contemporary space, knotted wood varied in color and texture reminiscent of a cabin or barn door, or unfinished wood that you can customize to your home design, Rustica offers many gorgeous options of quality Shiplap and wood planks.
Shiplap can be installed directly over drywall, or alternatively, you can also install shiplap in lieu of drywall. There are many advantages to choosing shiplap over traditional drywall, making it a popular and practical option.
Fast Installation
Shiplap can be installed in a matter of hours or days, depending on the size of your room or the number of accent walls. You’ll need minimal tools and really only an extra set of hands to help you hold up the boards while you nail. Drywall, to the contrary, takes much longer as multiple layers of compound need to be installed and allowed time to dry. Depending on the project, this could take a couple of weeks or more.
Clean Project
Shiplap does not create the mess that drywall can. Drywall always leaves an annoying layer of sand in your home after all of the taping, mudding, and sanding is finished. Shiplap creates minimal mess because no taping or mudding is involved, and only minimal sanding is necessary.
Cheaper Option
Real hardwood shiplap is more expensive than drywall but artificial materials like metal and vinyl siding can actually be cheaper. In addition, when taking into consideration all the additional steps and materials needed for drywall, a homeowner will actually end up paying more. Drywall costs anywhere from $1.50-$2.00 per sq ft, when adding in the cost of its necessary compound, as well as the priming and painting it requires.
Additionally, installing drywall is much more complicated than shiplap so it's not exactly a project you want to do DIY. Shiplap paneling is much easier to install on a wall and cheaper, too, costing about an average of $1 per sq ft. Therefore, shiplap costs will be much lower in comparison by the end of your project.
Perfect for Decor
The thickness of a shiplap board creates a perfectly stable and durable backing on which you can confidently hang picture frames, mirrors, and other heavy objects that would normally need to attach to beams.
2. Backsplash
Many homeowners choose to install shiplap in their kitchen or bathroom. Sometimes these boards are installed instead of tiles and sometimes they are used in conjunction with a traditional backsplash. Either way, the wooden boards can add a clean, modern look to your space or a shabby chic appeal.
Practical as it is stylish, shiplap’s watertight qualities make it perfect for installation behind water sources, like sinks, tubs or toilets. In order to protect the actual shiplap wall, you’ll need to coat the hardwood with a protective finish to prevent warping and staining from moisture or food.
3. Ceilings
You’ll be in awe every time you walk into a room with the clean, inviting lines of symmetrical shiplap. It’s not very often that our eyes are drawn to the ceiling so installing shiplap above is definitely an opportunity for home design that not many homeowners actually take advantage of. Its unique texture can add variety to the smooth walls of a bedroom or continue to bring unity to the decor of a country rustic room or contemporary home.
As with wall beams, make sure to find your ceiling rafters and nail directly into those, in addition to using wood glue. Alternatively, you can add strength by nailing rails first into the beams and then using this strengthened plank to back your shiplap.
You’ll also want to keep a jigsaw handy to cut around anything like lighting, fans, beams, or skylights that you don’t want to cover over with boards. Adding trim where the shiplap meets the wall is a common choice as well to help create a clean transition between different materials. You and your guests will be amazed at the gorgeous canopy you’ve created.
4. Wainscoting
Wainscoting is decorative paneling that traditionally extends halfway up a wall, at most. Today, some wainscoting moves away from conventional style, extending beyond a halfway point and may be installed both vertically and horizontally. Homeowners use shiplap as a form of wainscotting as it allows for even more diversity in texture, design, and function. Its watertight qualities make it the perfect wall decor for bathrooms or kitchens. Shiplap is also easily painted and customized making it the perfect way to frame your entryway or add a cozy feeling to a bedroom. Painted light or dark and matching or contrasting with wall color, shiplap easily finds its place as wainscoting within interior design.
5. Fireplaces
Shiplap looks amazing lining the walls of a fireplace or chimney or replacing a traditional mantel. Lining an electric fireplace with shiplap instead of traditional brick is much cheaper and provides a cozier, welcoming feeling to the place. You can also easily install shiplap over brick itself, using a masonry bit to drill holes. Shiplap will look exquisite as it climbs up from the fireplace opening and stretches all the way to the ceiling.
If installing shiplap around a real, traditional fireplace, it’s suggested that you first line the fireplace with a non-combustible material or keep that material in place if it already exists. These materials include steel, brick, marble, or stone. Similar to lining a chimney, you can use a masonry drill bit to get through the sturdy natural materials in order to put up your paneling.
Shiplap: The Perfect Choice for Home Renovation
There’s a reason why shiplap is coming back into style and it’s not just because of Chip and Joanna Gaines. Shiplap can be used in so many beautiful, diverse ways throughout the interior and exterior of a home, and each different method produces an eye-catching design that brings warmth, comfort, and personality to a space.
Use it as a backsplash in the kitchen or an accent wall in the living room. Add a shiplap frame around your mantel or an impressive shiplap ceiling to the bedroom. You can’t go wrong choosing shiplap during your home renovation, and Rustica is here to help you along the way.


Rustica Shop & HQ 1060 Spring Creek PlaceSpringville Utah 84663Customer Service & Sales(800)-891-8312

Hitching Post
Event Venue
1520 N Main Street
Springville UT 84663

PRODUCTS
FEATURES
COMPANY
BUSINESS