1.800.891.8312
Free Shipping Details
Most orders over $500 qualify. Free shipping applies to Barn Door Hardware, Barn Doors, and Pocket Doors over $500.
Note: Front doors, interior doors, shower doors, any oversized door (wider than 3ft and taller than 7ft) and any special order doors have shipping costs calculated at checkout. Some barn door hardware track lengths do not qualify for free shipping.


Dutch Z Combination Door Assembly Instructions
Dutch Z Combination Door Assembly Instructions & Video
Dutch Z Combination Door Recommended Tools
- Drill Phillips Bit
- Socket Wrench with 7/16" Socket
Dutch Z Combination Door Parts
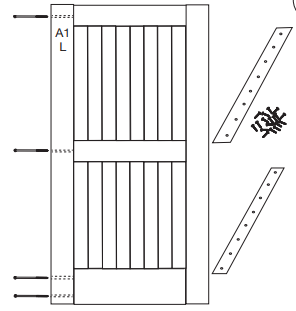
- A1 L - Left Side Stile QTY: 1
- A1 R - Right Side Stile QTY: 1
- A2 - Bottom Rail QTY: 1
- A3 - Middle Rail QTY: 1
- A4 - Top Rail QTY: 1
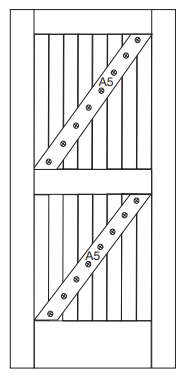
- A5 - Diagonal Rails QTY: 2
- B1, C1 - Outer Slats, lower QTY: 1 each
- B2, C2 - Tongue & Groove Slats QTY: 1 each
- B3, C3 - Outer Slats, upper QTY: 6 each**
- C2, C3 - Lower Tongue & Groove Slats Slat QTY: 6 each**
- D1 - 6” Lag Bolts QTY: 6**
- ** Can Vary Depending on Door Size
NOTE: If you are installing a Floor Mount Door Guide, your door will have a mortise (a groove that runs along the bottom of your door). Make sure this mortise is facing down towards your floor and that you install the Door Hangers on the other end.

Dutch Z Combination Door Assembly Instructions & Video
NOTE: The following should be a ‘dry’ assembly. Do not use adhesives in when putting this door together.
NOTE: This door model comes in various sizes. The instructions have been written for the average single door size; but larger doors may have more wood and fastener parts.
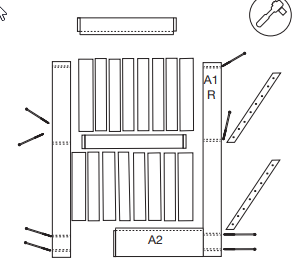
Lay out A1 R and A2 Bottom Rail. Square the sides with the bottom, then fasten them together with a 6” Lag Bolt (D1). Have someone help keep the door square as you attach with the Lag Bolt, going into the bottom of A1 R and into the Bottom Slat, A2. Have the Lag Bolt go straight in, no angle whatsoever, using your hands first, then a ratchet.
Slide B1, B2, and B3 slats’ tongues into A1 R and A2 grooves.
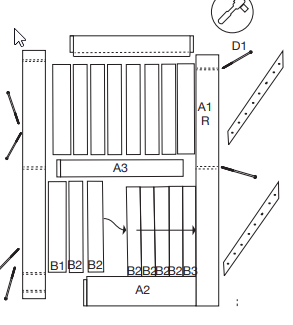
Once all of the lower slats have been positioned, place the A3 Center Rail onto the B slats and in the A1 R grooves. Fasten A3 into place with the center Lag Bolt, first with your hand, then tighten with a ratchet. Next, slide all C Slats down and to the right.
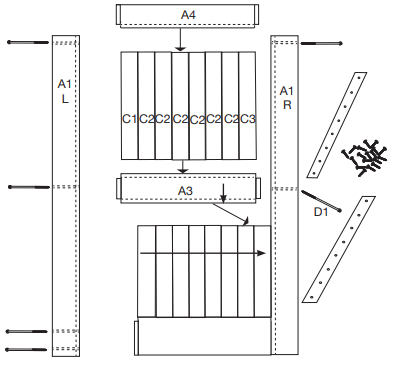
Slide Top Rail A4 into place, to cover the tops of the C Slats. Install a Lag Bolt into the top remaining hole on Side Stile A1 R. Tighten by hand then with a ratchet.
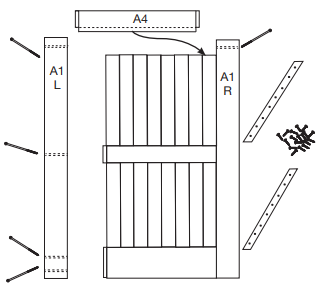
Slide Side Stile A1 L into place, attaching with remaining three 6” Lag Bolts, tightening by hand. Once again, have someone help you keep all of the slats straight. Once you have determined all are in place straight, tighten Lag Bolts with a ratchet.
When the Door is assembled, place A5 Rails (Diagonal Rails) onto the door so the predrilled holes are facing up and so they run the same way, from corner to corner. Attach using the 1-1/4” Grabber Screws and a drill with a Phillips bit.
Attach the Door Pull of your choice and your Door is ready to hang.


PRODUCTS
FEATURES
COMPANY
BUSINESS