1.800.891.8312
Free Shipping Details
Most orders over $500 qualify. Free shipping applies to Barn Door Hardware, Barn Doors, and Pocket Doors over $500.
Note: Front doors, interior doors, shower doors, any oversized door (wider than 3ft and taller than 7ft) and any special order doors have shipping costs calculated at checkout. Some barn door hardware track lengths do not qualify for free shipping.


Soft Close System Assembly Instructions
Triple Bypass System Recommended Tools
- Drill with 1/8” Drill Bit and Phillips Screw Bit
- Socket Wrench with 9/16” Socket
Triple Bypass System Parts
- 2 Soft Close Mechanisms
- Mounting Bracket
- 4 Pan Head Screw
- 4 Phillips Screw
- 2 Stop Tab
Soft Close System Installation Instructions
Step 1: Attach the Soft Close Mechanism (A) to The Mounting bracket (B) using two pan head screws (C) (Figure 1). Set aside.

Step 2: Remove the last two lag screws, washers, and hard stop from the track (Figure 2).

Step 3: Reduce the length of last two spacers by rotating clockwise about two turns (Figure 3).

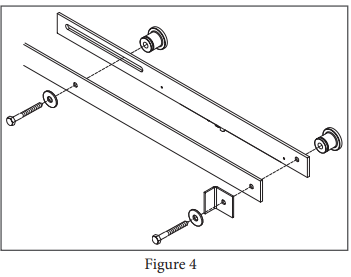
Step 4: Place the soft close mounting bracket and mechanism against the back of the track with the soft close mechanism facing the wall (Figure 4).
Step 5: Reinstall the lag screws, washers and hard stop (Figure 5).

Step 6: Slide the door to the closed position.
Step 7: Align the stop tab on the top edge of the door to interact with the soft close mechanism (Figure 6).

Suggestion: Use double stick tape to hold the tab in place when making adjustments and installing.
Step 8: Install the tab on the door using the two phillips head screws (provided) (Figure 6).
Step 9: Repeat steps 1 through 8 for the opposite side of the track.
Soft Close System Assembly Instructions
Triple Bypass System Recommended Tools
- Drill with 1/8” Drill Bit and Phillips Screw Bit
- Socket Wrench with 9/16” Socket
Triple Bypass System Parts
- 2 Soft Close Mechanisms
- Mounting Bracket
- 4 Pan Head Screw
- 4 Phillips Screw
- 2 Stop Tab
Soft Close System Installation Instructions
Step 1: Attach the Soft Close Mechanism (A) to The Mounting bracket (B) using two pan head screws (C) (Figure 1). Set aside.
Step 2: Remove the last two lag screws, washers, and hard stop from the track (Figure 2).
Step 3: Reduce the length of last two spacers by rotating clockwise about two turns (Figure 3).
Step 4: Place the soft close mounting bracket and mechanism against the back of the track with the soft close mechanism facing the wall (Figure 4).
Step 5: Reinstall the lag screws, washers and hard stop (Figure 5).
Step 6: Slide the door to the closed position.
Step 7: Align the stop tab on the top edge of the door to interact with the soft close mechanism (Figure 6).
Suggestion: Use double stick tape to hold the tab in place when making adjustments and installing.
Step 8: Install the tab on the door using the two phillips head screws (provided) (Figure 6).
Step 9: Repeat steps 1 through 8 for the opposite side of the track.


PRODUCTS
FEATURES
COMPANY
BUSINESS