1.800.891.8312
Free Shipping Details
Most orders over $500 qualify. Free shipping applies to Barn Door Hardware, Barn Doors, and Pocket Doors over $500.
Note: Front doors, interior doors, shower doors, any oversized door (wider than 3ft and taller than 7ft) and any special order doors have shipping costs calculated at checkout. Some barn door hardware track lengths do not qualify for free shipping.


Heartland Door Assembly Instructions
Heartland Door Assembly Instructions & Video
Heartland Door Recommended Tools
- Rubber Mallet
- Socket Wrench with 7/16" Socket
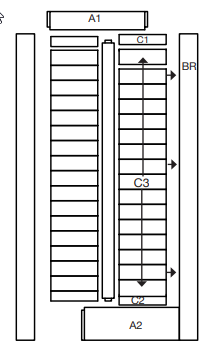
Heartland Door Parts
- A1 - Top Rail QTY: 1
- A2 - Bottom Rail QTY: 1
- BL - Left Stile QTY: 1
- BC - Center Stile QTY: 1
- BR - Right Stile QTY: 1
- C1 - Top Slat QTY: 2
- C2 - Bottom Slat QTY: 2
- C3 - Slats QTY: 32
- D - Dowels QTY: 2
- E - 6” Lag Bolts QTY: 6
- F - Wood Glue QTY: 4oz
NOTE: If you are installing a Floor Mount Door Guide, your door will have a mortise (a groove that runs along the bottom of your door). Make sure this mortise is facing down towards your floor and that you install the Door Hangers on the other end.

Heartland Door Assembly Instructions & Video
NOTE: These instructions are specific to a particular door size and type. Adjustments may be needed on your part for changes in specifications and measurements, as well as door types that are different from these.
Starting from the bottom up (bottom is identified by having a thin groove (mortise) along the bottom edge) lay A2 and BR facing each other so the large groove on the side of the stile (BR) is on the inside, and the 3 holes are facing out. Using the included glue, apply a bead of glue in the groove of the BR part starting about 1” up from the bottom and up to about 7” from the bottom. You will then take the 9” high rail (A2) and place it in the right side stile (BR) where the glue was applied, making sure the thinner groove is on the bottom of the door. (The two parts need to be lined up in a 90-degree opposite L-shape, being flush on the bottom). Gently tap all into place with a rubber mallet. Using the included ¼” x 6” lag bolts, take 2 of them and place them in the 2 bottom holes that are predrilled, using the 7/16” socket attached to a ratchet to tighten those 2 lags as tight as possible making sure that the parts are pulled together tightly.

Next you will need to turn the assembled parts onto their sides where the holes are. Locate one C1 part, sixteen C3 parts, and one C2 part. Next, apply a bead of glue running lengthwise up the BR part until you are about 5” from the top. Quickly, starting from the bottom place in the C2 parts with the groove facing the top of the door, then stack in all sixteen C3 parts in succession, tongue into grooves. Then take the final part (C1) to cap off the T&G. Using a soft mallet gently tap all parts down into part A2, and each part to the side into Stile BR.
Next you will identify the BC center stile. You will notice that the A2 rail (the part that you already lagged together) has a small hole drilled in the groove of the part. This is for placing the included wood dowel pin into place. On the ends of the BC, you will notice matching holes. Use a small dab of glue in the holes of the BC part and the A2 part, insert the dowel into the holes. This part is also universal and can be used on either end. Next, run a bead of glue along the edge of the already inserted T&G. Put a drop of glue on the dowel on one end, place that part into the alignment hole on the bottom rail, and then set into place over the T&G, using a mallet, lightly tap this part into place.

Next, you will repeat the setting in of the C1, C2, and C3 parts for the second panel. See #2, above.

Next, you will identify the A1 part or top rail as we call it. This part is the capping piece on top and goes in similar to the bottom rail. Place a bead of glue in the groove of the BR part, should be about 5” left to glue. Then put glue in the groove of the A1 part, including the alignment hole for the dowel. This part will slide into place from the top working towards the bottom.

The final item is to place the BL stile into place. Place a bead of glue in either the groove on that part or along the edge of the bottom and top rails and along the edge of the T&G. Align all parts to be flush on the top and bottom. A little persuasion with your mallet might be needed. Insert the remaining lag bolts, tightening as tight as you can to ensure proper adhesion of the glue. If any glue has leaked out anywhere, you can use a water-dampened cloth to remove the glue before it dries.

Congratulations on the assembly of your amazing Heartland Door. We are always here to help. If you have questions, please call us for assistance.


PRODUCTS
FEATURES
COMPANY
BUSINESS