1.800.891.8312
800-891-8312
FREE SHIPPING*
Free Shipping Details
Most orders over $500 qualify. Free shipping applies to Barn Door Hardware, Barn Doors, and Pocket Doors over $500.
Note: Front doors, interior doors, shower doors, slab doors, any oversized door (wider than 3ft or taller than 7ft), and any special order doors have shipping costs calculated at checkout. Some barn door hardware track lengths do not qualify for free shipping.


How to Install a Barn Door Track System
Tuesday, October 23rd, 2018
Author: Kate Allen - Rustica Founder and CEO
Share
Slide into your next DIY house project
There’s no denying the allure of having a sliding barn door in your home. They’re the perfect blend of country charm and contemporary class, not to mention a unique and stylish way to add privacy, divide rooms and save space. And the best part – they’re fairly easy to install on your own. So, stop dreaming and start doing with this easy-to-follow barn door track installation tutorial guide.
But before we get started, it’s important to make sure you have all the necessary hardware. Your sliding barn door system should come with a kit containing a flat steel track, track joint brackets, spacers, screws, bolts (carriage and lag), rubber bumpers, hanger rollers, bottom rollers and bottom roller guide.
Have everything you need? Good! Let’s get started on our DIY barn door track installation walkthrough! (For visuals of this process in action, check out our video on how to install a barn door track system.)
Pro tip: You’ll want to cut the track at least twice the width of the door to allow the sliding door to open the entire width of the door space.
Pro tip: Consider applying some oil to the drill hole in order to keep it cool to the touch during the process.
And just like that, you’ve knocked out a DIY barn door track system project in relatively no time flat! Now, simply sit back and enjoy having an attractive and practical sliding door that will add visual interest to your home and wow your guests.
Ready to install your sliding barn door? Check out our DIY Sliding Barn Door Kit.
There’s no denying the allure of having a sliding barn door in your home. They’re the perfect blend of country charm and contemporary class, not to mention a unique and stylish way to add privacy, divide rooms and save space. And the best part – they’re fairly easy to install on your own. So, stop dreaming and start doing with this easy-to-follow barn door track installation tutorial guide.
But before we get started, it’s important to make sure you have all the necessary hardware. Your sliding barn door system should come with a kit containing a flat steel track, track joint brackets, spacers, screws, bolts (carriage and lag), rubber bumpers, hanger rollers, bottom rollers and bottom roller guide.
Have everything you need? Good! Let’s get started on our DIY barn door track installation walkthrough! (For visuals of this process in action, check out our video on how to install a barn door track system.)
Step 1: Anchor your mounting board
The first step to making sure your barn door track system is properly installed is to ensure the track is securely mounted to the wall. To do this, add support by attaching a mounting board to the wall that’s approximately 1x4 inches. Your mounting board should be roughly the same length as the track, but a little wider. Use drywall anchors, spacers and your lag bolts to secure the board. You can even paint or stain your mounting board for a more finished look.Step 2: Prep the track
Next, using the manufacturer’s instructions, assemble the flat steel track with your joint brackets. Go ahead and use a handsaw to cut the track to the desired length.Pro tip: You’ll want to cut the track at least twice the width of the door to allow the sliding door to open the entire width of the door space.
Step 3: Drill pilot holes
Once you’ve situated the track where you want it on the mounting board/wall, now it’s time to measure and drill holes with a metal-cutting drill bit. It’s wise to use an awl or punch to create a seat for the drill bit, ensuring that it doesn’t slip on the metal when you begin drilling.Pro tip: Consider applying some oil to the drill hole in order to keep it cool to the touch during the process.
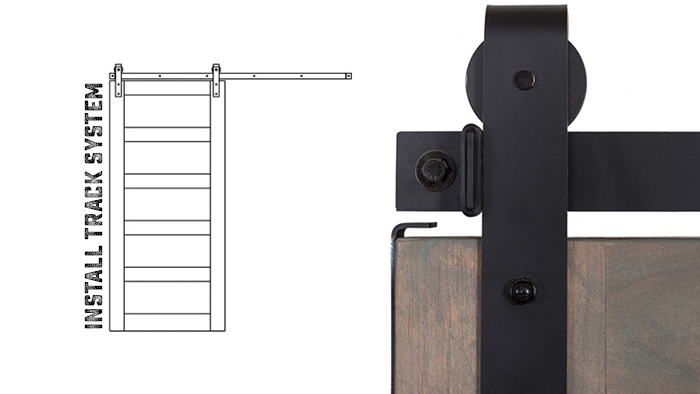
Step 4: Install the track and place your spacers
Making sure the track is perfectly level on the wall above the door opening. You are sure it’s properly aligned, use your lag bolts to install both the track and spacers to the mounting board and wall. Attach the rubber bumpers that came with your kit to both stops near either end of your track.Step 5: Attach the hanger rollers
Now that the track is firmly level and secure, it’s time to attach the hanger rollers to the actual door using the supplied carriage bolts, washers and nuts. Tighten them with a socket wrench.Step 6: Install the bottom roller guide
Just one more step to go! Now it’s time to install your bottom roller guide. Without it, your door will slide – and swing – when opened. A bottom roller guide helps keep the door in place when someone slides it open or closed.Step 7: Hang the door
The last step to installing your barn door track is to finally hang your door from the hanger rollers and line it up onto the track. Make sure there’s no bend in the track and that all of your components are level and secure before opening and closing your door.And just like that, you’ve knocked out a DIY barn door track system project in relatively no time flat! Now, simply sit back and enjoy having an attractive and practical sliding door that will add visual interest to your home and wow your guests.
Ready to install your sliding barn door? Check out our DIY Sliding Barn Door Kit.


Rustica Shop & HQ 1060 Spring Creek PlaceSpringville Utah 84663Customer Service & Sales(800)-891-8312


PRODUCTS
FEATURES
COMPANY
BUSINESS