1.800.891.8312
Free Shipping Details
Most orders over $500 qualify. Free shipping applies to Barn Door Hardware, Barn Doors, and Pocket Doors over $500.
Note: Front doors, interior doors, shower doors, any oversized door (wider than 3ft and taller than 7ft) and any special order doors have shipping costs calculated at checkout. Some barn door hardware track lengths do not qualify for free shipping.
Heavy Spacer Assembly Instructions
Heavy Spacer Recommended Tools
- Drill with 1/8” and 1/4” Drill Bit and Phillips Screw Bit
- 7/16" Combination Wrench
- Socket Wrench with 7/16 and 9/16” Socket
- Level
- Tape Measure
- Pencil
Heavy Spacer Parts
- Heavy Duty Spacer
- Lag Screw
- 3/8" Hex Bolt
- Washer
- Nut
- 3" Wood Screw
- Hard Stop & Rubber Bumper
Heavy Spacer Installation Instructions
First Things First: Check to see if the floor below the track area is level. If the floor rises more than 1/2” the door may rub or not slide open completely. If the floor is not level, measure from the highest point of the floor surface to the recommended track placement and adjust track placement accordingly.
It will be necessary to install a header for the track when wall studs are not lining up with the track and door installation. Headers provide the necessary strength and stability for the track and door
Track & Door Installation Prep
Step 1: To determine where the track should be installed, first measure the height of the door, then add 2-1/8” to the door length. 1/2” will be for the clearance between the bottom edge of the door and the floor. 1-5/8” will be from the top edge of the door to the center of the track. (Figure 1).

Step 2: Using a level and a pencil, make a line above the doorway the same length as the track.
Note: The header should be 6" tall and 4" longer than the track.
Header Installation
Step 3: Using a stud finder, locate the studs along the area the header will be installed. Mark stud locations with a pencil (Figure 2).

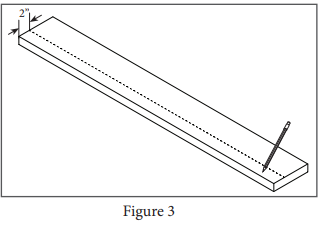
Step 4: Lay the header on a flat clean surface. Using a measuring tape, measure 2” from the bottom of the header. Draw a line the length of the header with a pencil (Figure 3).

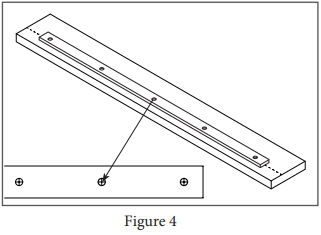
Step 5: Lay the track on top of the header, centering it with the line drawn on the header. Ensure the track is 2” from either end of the header. Using a pencil, mark the hole positions in the track onto the header (Figure 4). Set the track aside.

Step 6: Mark the center of the stud onto the header. Mark 1” from the top edge and 1” above the bottom edge (Figure 5).

Step 7: Place the heavy spacer (A.) so the tongue of the spacer is centered on the vertical pencil line for the track. Mark the center of each of the three holes in the spacer back. Repeat for remaining spacers (Figure 6).

Step 8: Drill out the holes marked for stud mounting using a drill and 1/8” drill bit. Drill out the holes marked for heavy spacer mounting using a drill with a 1/4” drill bit (Figure 7).

Step 9: Align the line on the wall with the line made on the header in step 4. Ensure pilot holes align with wall studs (Figure 8).
Step 10: Install header using 3” wood screws (D.) (Figure 8).

Step 11: Install spacers (A.) with a socket wrench using lag screws (B.) (Figure 9).

Step 12: Begining with the end spacer on either end of the header, install the track using a socket wrench and combination wrench and one hex bolt (C.), two washers (D.), one nut (E.), and one hard stop (G.) (Figure 10). Do not tighten.

Step 13: Rotate the track up and repeat installation for the other end of the track. Do not tighten.
Step 14: Attach the track to the remaining spacers using one hex bolt, two washers, and one nut for each spacer. Tighten all hardware.
Step 15: Stretch rubber bumper (provided) over hard stop. Repeat for the hard stop on the other end of the track (Figure 10A).


Hitching Post
Event Venue
1520 N Main Street
Springville UT 84663
PRODUCTS
FEATURES
COMPANY
BUSINESS


