1.800.891.8312
Free Shipping Details
Most orders over $500 qualify. Free shipping applies to Barn Door Hardware, Barn Doors, and Pocket Doors over $500.
Note: Front doors, interior doors, shower doors, any oversized door (wider than 3ft and taller than 7ft) and any special order doors have shipping costs calculated at checkout. Some barn door hardware track lengths do not qualify for free shipping.


Full X Door Assembly Instructions
Full X Door Assembly Instructions & Video
Full X Door Recommended Tools
- Drill Phillips Bit
- Rubber Mallet
- Socket Wrench with 7/16" Socket
- Adjustable Square
Full X Door Parts
- A1 L - Left Side Stile QTY: 1
- A1 R - Right Side Stile QTY: 1
- A2 - Bottom Rail QTY: 1
- A3 - Top Rail QTY: 1
- A4 - Diagonal Overlay QTY: 2
- A5 - Short Diag Overlay QTY: 2
- A6 - Short Diag Overlay QTY: 2
- B1 - Left Side Slat QTY: 1
- B2 - Middle Slats QTY: 6 (Can vary depending on door size)
- B3 - Right Side Slat QTY: 1
- C - 3/4" Phillips Screw QTY: 30 (Can vary depending on door size)
- D - 6” Lag Screws QTY: 6 (Can vary depending on door size)
Full X Door Assembly Instructions & Video

FIRST THINGS FIRST
Lay out all wood parts before beginning assembly to ensure parts have not been damaged in shipping. If damage has occurred, call 1(888) 909-6546 and Barn Doors & Hardware will expedite a replacement.
NOTE: This door model comes in various sizes. The instructions have been written for the average single door size; but larger doors may have more wood and fastener parts.

NOTE: Always alternate the direction of the wood grain when assembling slats. This will add strength to the assembly and help prevent warpage.
NOTE: Doors using Floor Mount Door Guides will have a groove on the bottom edge. Ensure this groove is on the bottom when hanging the door.
Use teamwork - We recommend two people for this build.
By Definition:Tongue and Groove Tongue refers to the ridge extending beyond the main portion of the slat. Groove refers to the slot cut into the other side of the slat.
NOTE: The following should be a ‘dry’ assembly. Do not use adhesives in when putting this door together.
1. On a flat, clean surface, lay out the right slat (B3) with the groove facing to the left. Lay all middle slats (B2) next to B3 with the tongue facing to the left. Lay the left slat (B1) to the left of the last B2 slat with the groove facing right. Assemble by fitting the tongue into the groove of each piece. Gently tap into place with a rubber mallet to seat the slats together (Figure 1).

SUGGESTION Use an adjustable or fixed carpenter’s square to ensure all sides of the door are square to each other
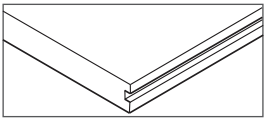
2. Place the bottom rail (A2) below the assembled slats. Slide upward to cover the lower edge of the slat assembly. Tap the bottom rail into place with a rubber mallet (Figure 2).

3. Place the Top Rail (A3) above the assembled slats. Slide downward to cover the upper edge of the slat assembly. Tap the Top Rail into place with a rubber mallet (Figure 3).

4. Place the left side style (A1-L) beside the assembled slats and rails. Slide to the right to cover the top and bottom rail tongues and the edge of the slat assembly. Tap the rails into place with a rubber mallet. Repeat with the right stile (A1-R) (Figure 4).

5. Fix the door assembly with six 6” lag screws (D), using a socket wrench with a 7/16” socket (Figure 5).

6. Lay the Diagonal Overlays (A4, A5, A6) across the slats. Attach to slats and with phillips screws (C) using a drill with a phillips bit (Figure 6).
7. Turn the door over. Repeat step six for the other side.


Hitching Post
Event Venue
1520 N Main Street
Springville UT 84663

PRODUCTS
FEATURES
COMPANY
BUSINESS