1.800.891.8312
800-891-8312
FREE SHIPPING*
Free Shipping Details
Most orders over $500 qualify. Free shipping applies to Barn Door Hardware, Barn Doors, and Pocket Doors over $500.
Note: Front doors, interior doors, shower doors, slab doors, any oversized door (wider than 3ft or taller than 7ft), and any special order doors have shipping costs calculated at checkout. Some barn door hardware track lengths do not qualify for free shipping.


Change Your Space–Fall Fireplace Mantels
Friday, August 16th, 2019
Author: Kate Allen - Rustica Founder and CEO
Share
Change Your Space This Fall with a Fireplace Mantel
The weather starts to cool and the leaves change colors signaling cozy family gatherings in your home. This is the perfect time of year to update your gathering area. Improving your family room is a lot easier than you think. The floating fireplace mantels we make from scratch can be used over a fireplace or as the perfect floating shelf for a TV. In this blog post we will show how simple it is to install and add a new level to your family room.Fireplace Mantel as a Floating TV Shelf:
Tools Needed:

Drill with 1/8”, Drill Bit, and Phillips Bit


FIGURE 1
Step 1: Decide at what height the mantel is to be installed. Using a level, mark the location with a pencil. Make another line 2-1/4” below the mantel line height (Figure 1).
Step 2: Using a stud finder, locate the studs along the area the mantel will be installed. Mark stud locations with a pencil (Figure 1).
Step 3: Lay the cleat on a smooth, flat surface. Measure 1-1/2” from the top edge of the cleat. Using a ruler, draw a line across the cleat.
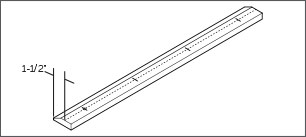
FIGURE 2
Step 4: Measure four evenly spaced areas along the cleat line made in step 1, utilizing studs where possible (Figure 2).
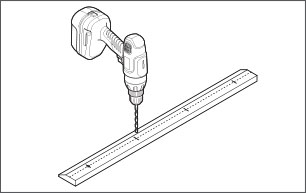
Step 5: Drill pilot holes through measurement lines in the cleat using an 1/8” drill bit (Figure 3).

FIGURE 4
Step 6: Place the cleat on the cleat line made in step 1 (Figure 4).
SUGGESTION: Use double stick tape on the back of the cleat to help hold the cleat in place while completing step 7.
Step 7: Mark the wall with an awl through the pilot holes in the cleat. Set the cleat aside (Figure 4).

FIGURE 5
Step 8: Install drywall anchors only where mantel installation does not intersect with a wall stud (Figure 5).
NOTE: Do not install anchors in wall studs.
Step 9: Drill an 1/8” hole where installation intersects with a wall stud (Figure 5).

FIGURE 6
Step 10: Attach the cleat to the wall using drywall anchor screws (Figure 6).

FIGURE 7
Step 11: Hang the mantel on the cleat. Secure with three Phillips head mantel screws (Figure 7).
Fireplace Mantel with Surrounds:
Follow the above instructions EXCEPT you will need to be sure you add 1/8”–1/16” to the distance between the bottom of the mantel and your floor to allow for some clearance so that the surrounds will fit under your mantel when installed.
FIGURE 1
Step 1: Anchor supplied face mounts to your wall where you want your surrounds to sit under your mantel. Install one set just below the mantel and one set along the floor (Figure 1).

FIGURE 2

FIGURE 3
Step 2: Slide your surrounds over the face mounts (Figure 2). The mounts should rest nicely in the grooves inside your surrounds (Figure 3).

FIGURE 4
Step 3: Finish by screwing in the supplied grabber screws through the pre-drilled holes in your surrounds to secure them to the face mounts. Repeat for the face mounts installed along the floor (Figure 4).
The easy installation allows for you to accomplish this in an afternoon. With fall football games or chilly evenings gathered around the fireplace with a cup of hot cocoa you now have the perfect space to host whatever the event is. We designed our fireplace mantels to be functional centerpieces while offering utility and convenience.


Rustica Shop & HQ 1060 Spring Creek PlaceSpringville Utah 84663Customer Service & Sales(800)-891-8312


PRODUCTS
FEATURES
COMPANY
BUSINESS